


The Power of Smart Templates – Deep Dive 1
In article one of this series, you might remember, we took a 10,000 ft overview of what GraFx Publisher Smart Templates are. We looked at where and how they are created, and some common use cases. We also saw how they give businesses a serious graphical production boost, especially when it comes to localization, personalization, and omnichannel output.
This is the second article in a three-part series. You can read the first article on The power of Smart Templates
In this article, we’re going to begin a two-part deep dive into just how smart these Smart Templates really are. Much of the graphical work you probably think requires tedious, repetitive manual intervention by your creative team can, in fact, be automated. It’s why we call CHILI GraFx a Creative Automation platform. Here’s an outline of what we’ll cover in today’s first deep dive:
And to add to the excitement, here’s what we’ll be looking at in next month’s installment:
- Alternate & Dynamic Layouts
- Actions
- Dynamic Asset Providers
- Repro-ready PDF Output
But even with today’s four killer features the possibilities are endless, so let’s dive in!
A Quick Recap on the Benefits of Smart Templates
Before we start, here’s a quick reminder on how Smart Templates automate and improve graphical production. Smart Templates:
- Automate repetitive processes and bring scale to graphic production.
- Enable self-service so end users can create content while staying within brand guidelines.
- Intelligently generate multiple variants of the same graphic for both digital and print.
Now let’s get started!
Your Smart Template Mission
To help you grasp the following Smart Template features, let’s contextualize things by resurrecting our nattily named company from the first article in this series: ACME Smart Retail.
Business is, of course, booming since you deployed GraFx Publisher in your global retail chain. And you’re now hard at work setting up your latest creatively automated marketing masterpiece for a one-day global shopping bonanza sale.
Flyers, adverts (digital and print), printed paper bags and bookmarks, POS materials, badges, stickers, etc. It’s still a little unclear what exactly you’ll need right now, but there’s going to be lots of it.
Now, let’s imagine you have a document open in GraFx Editor with a basic design in it. Ready to get started?
Smart Template Key Features
*Note: In our following overview of Smart Templates, we’ve put a “Geek Alert” in front of one of the items on the list. Yes, that one is a little more technical to set up, but the benefits are easy enough to understand without breaking out a code editor! *
Constraints
The whole idea of a template is that some parts are editable and some are not. As parts of your artwork and fonts while, for example, enabling end users to modify certain text fields. This makes manual localization and personalization a cinch.
Okay, “constraints” might be a slightly dull word to start the ball rolling, but it’s also the GraFx Publisher feature that is going to stop you from getting ugly results. It also has a very positive effect on brand consistency and price discounts, as you can imagine.
You can go further too. With GraFx Publisher you can also lock, hide or customize every part of the GraFx Editor interface. Want to keep things very simple for that store in New York where if they see a button they click it? No problem! You can hide absolutely anything you like from the click-happy crew.
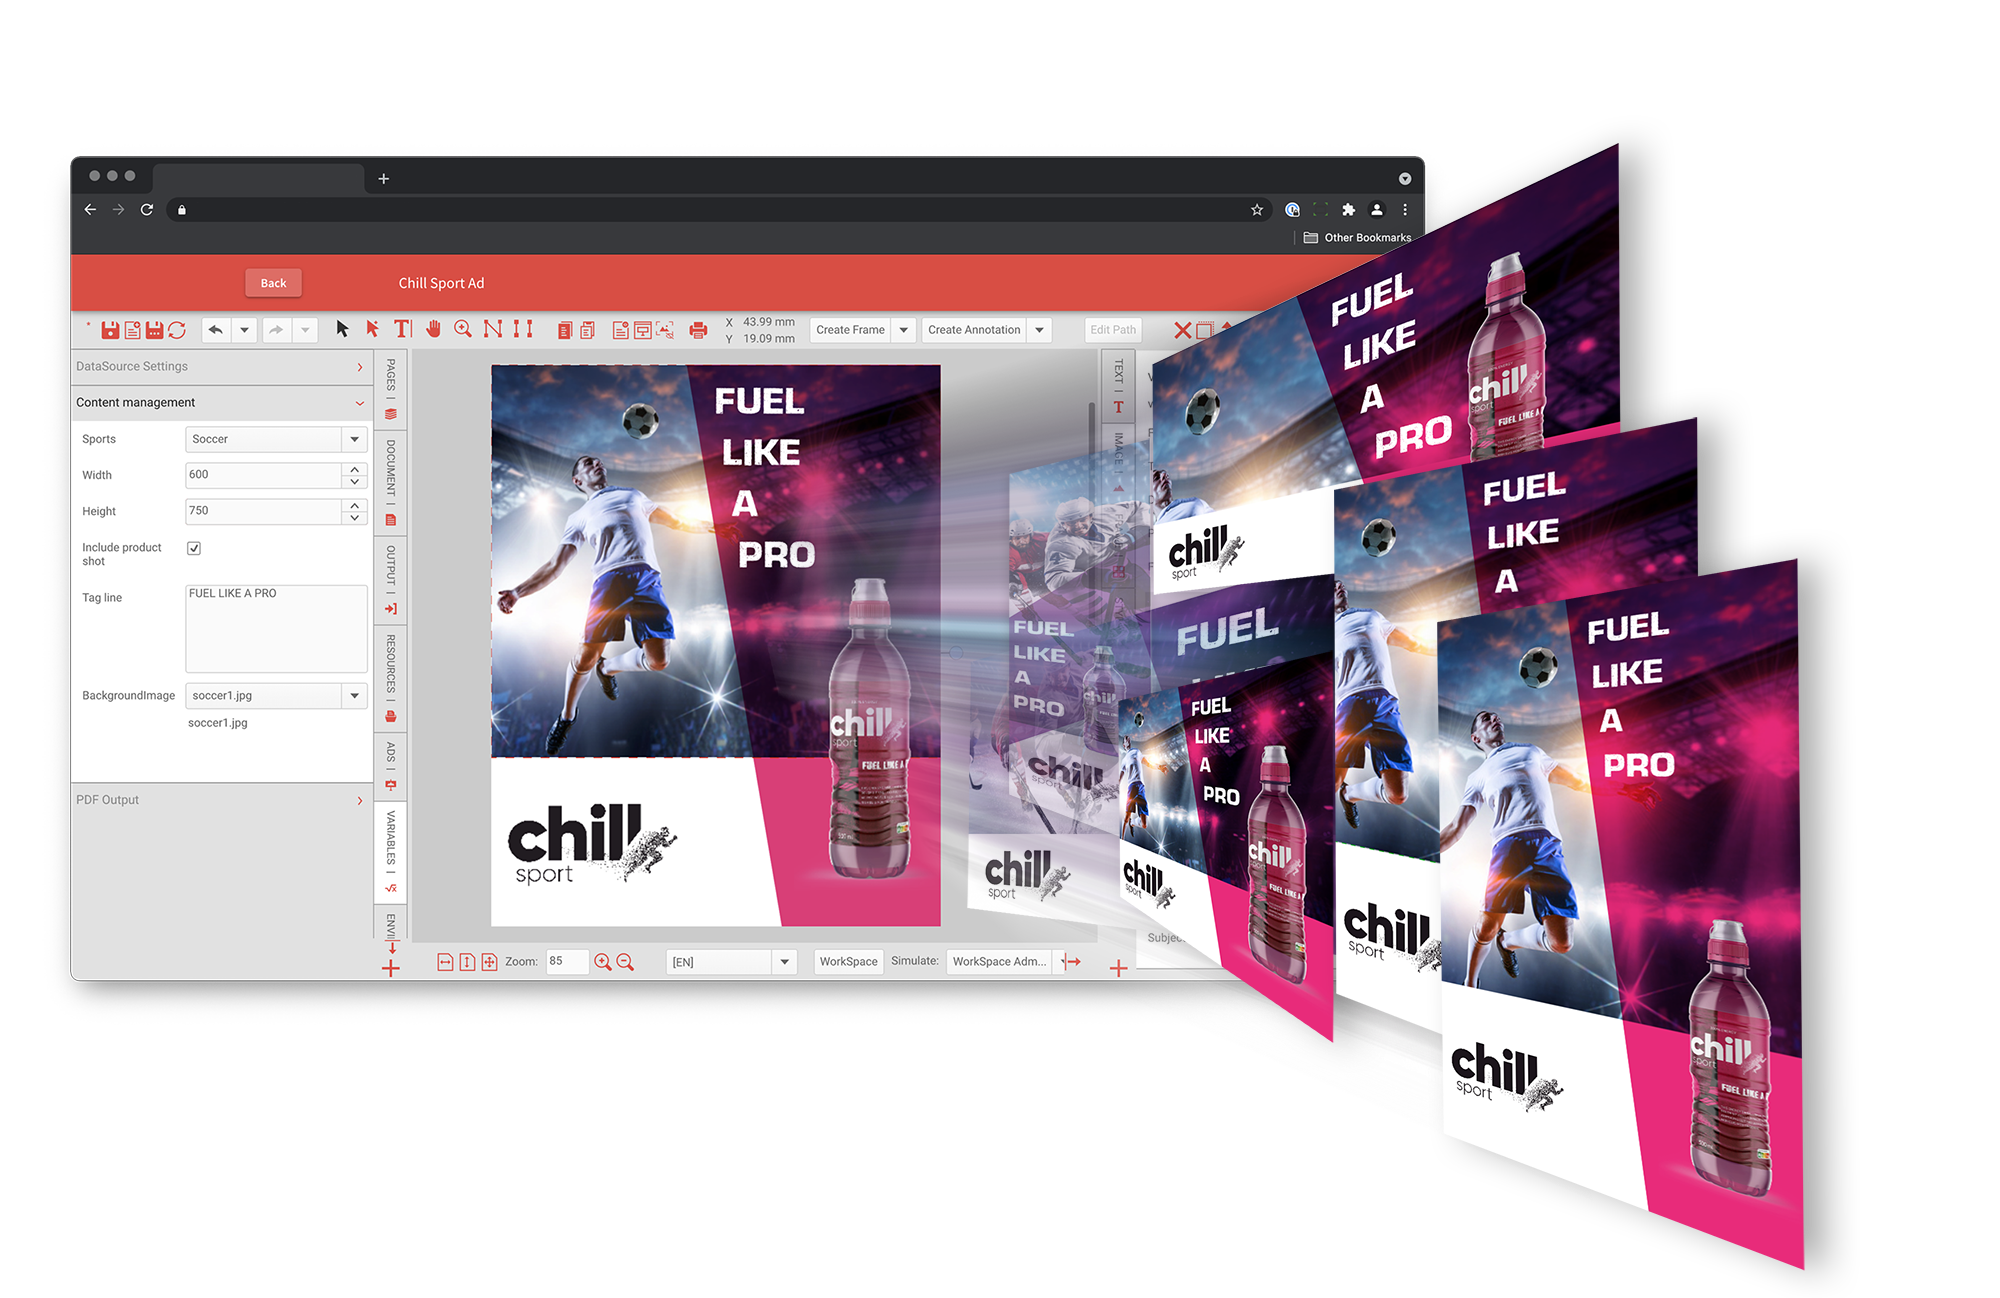
Variables
Think a word like “Variables” deserves a Geek Alert? Think again! These are so easy to grasp that you already understood them perfectly when we introduced them in the first article in this series. Just switch out “variables” with “placeholders” and you’re halfway to impressing your nerdy friends. Of course, you can go deep into variables too.
Let’s split variables into two arbitrary categories to make them super easy to grasp. For the purposes of this article only, we’ll call them “Essential Variables” and “Smart Variables.” Let’s go!
“Essential” Variables
Let’s say that as part of your big ACME Smart Retail shopping bonanza, you’re going to print cool, glittery badges for every in-store sales rep in your massive global retail chain. The badges will have the rep’s full name on them and a second line that says, “You can call me ________!” The store rep will be able to log in to your GraFx Publisher portal and enter their nickname in that space in the template.
For example, your sales rep Alaister Smith in Newark, New Jersey will be able to log in and fill out his badge as follows:
ALAISTER SMITH
You can call me Smithy!
(Wait! Did you really think he’d enter, “You can call me Al”, did you?) **
How’s that done? In your Smart Template, you’d create two variables: one called %FullName% and one called %NickName%. You then link those variables to the fields in the document where the rep’s name and nickname should be entered. In this case, you let “Al” take care of the %NickName%, and GraFx Publisher’s automation prowess handles the %FullName% bit.
**Congratulations! You’ve just created a variable-driven document that can be personalized by staff across the globe! **
And if you’re wondering how we automagically got “ALAISTER SMITH” into the %FullName% variable when Al logged in, you’ll need to read to the end of this article series.
“Smart” Variables
Hopefully it’s no surprise to hear you can go much further with variables. And the good news? The further you go, the less work you have to do down the line!
These variables aren’t, in essence, different from our “Essential” friends above, but we’re giving them a new name because they are variables that have learned special powers.
GraFx Publisher has a lot of intelligent features you can apply to your template documents. “Alaister Smith,” for example, is a fairly short name, but what if you have a sales rep called “Salvador Felipe Jacinto Dalí y Domenech” working in your store in Figueres, Spain?
Text that long might overflow and get cut off if the text field in your document is too small to contain it. And things might get weird if this happens.
Enter Document Intelligence! When content is unpredictable like this, variables offer you a wide range of options for keeping your artwork looking good without manual intervention.
For example, you can set a text frame to expand in a certain direction when the content is going to get truncated otherwise. And you can deploy this type of variable in endless situations.
And if you’re thinking, “I’d prefer for the font size to shrink rather than see my text boxes expand,” no problem! GraFx Publisher comes with powerful copyfitting capabilities that can handle that flawlessly!
Whichever you choose, it won’t just please Salvador. It also massively reduces the load of boring, repetitive work that your designers once had to do on a case-by-case basis. It also makes creating content much easier for end users.
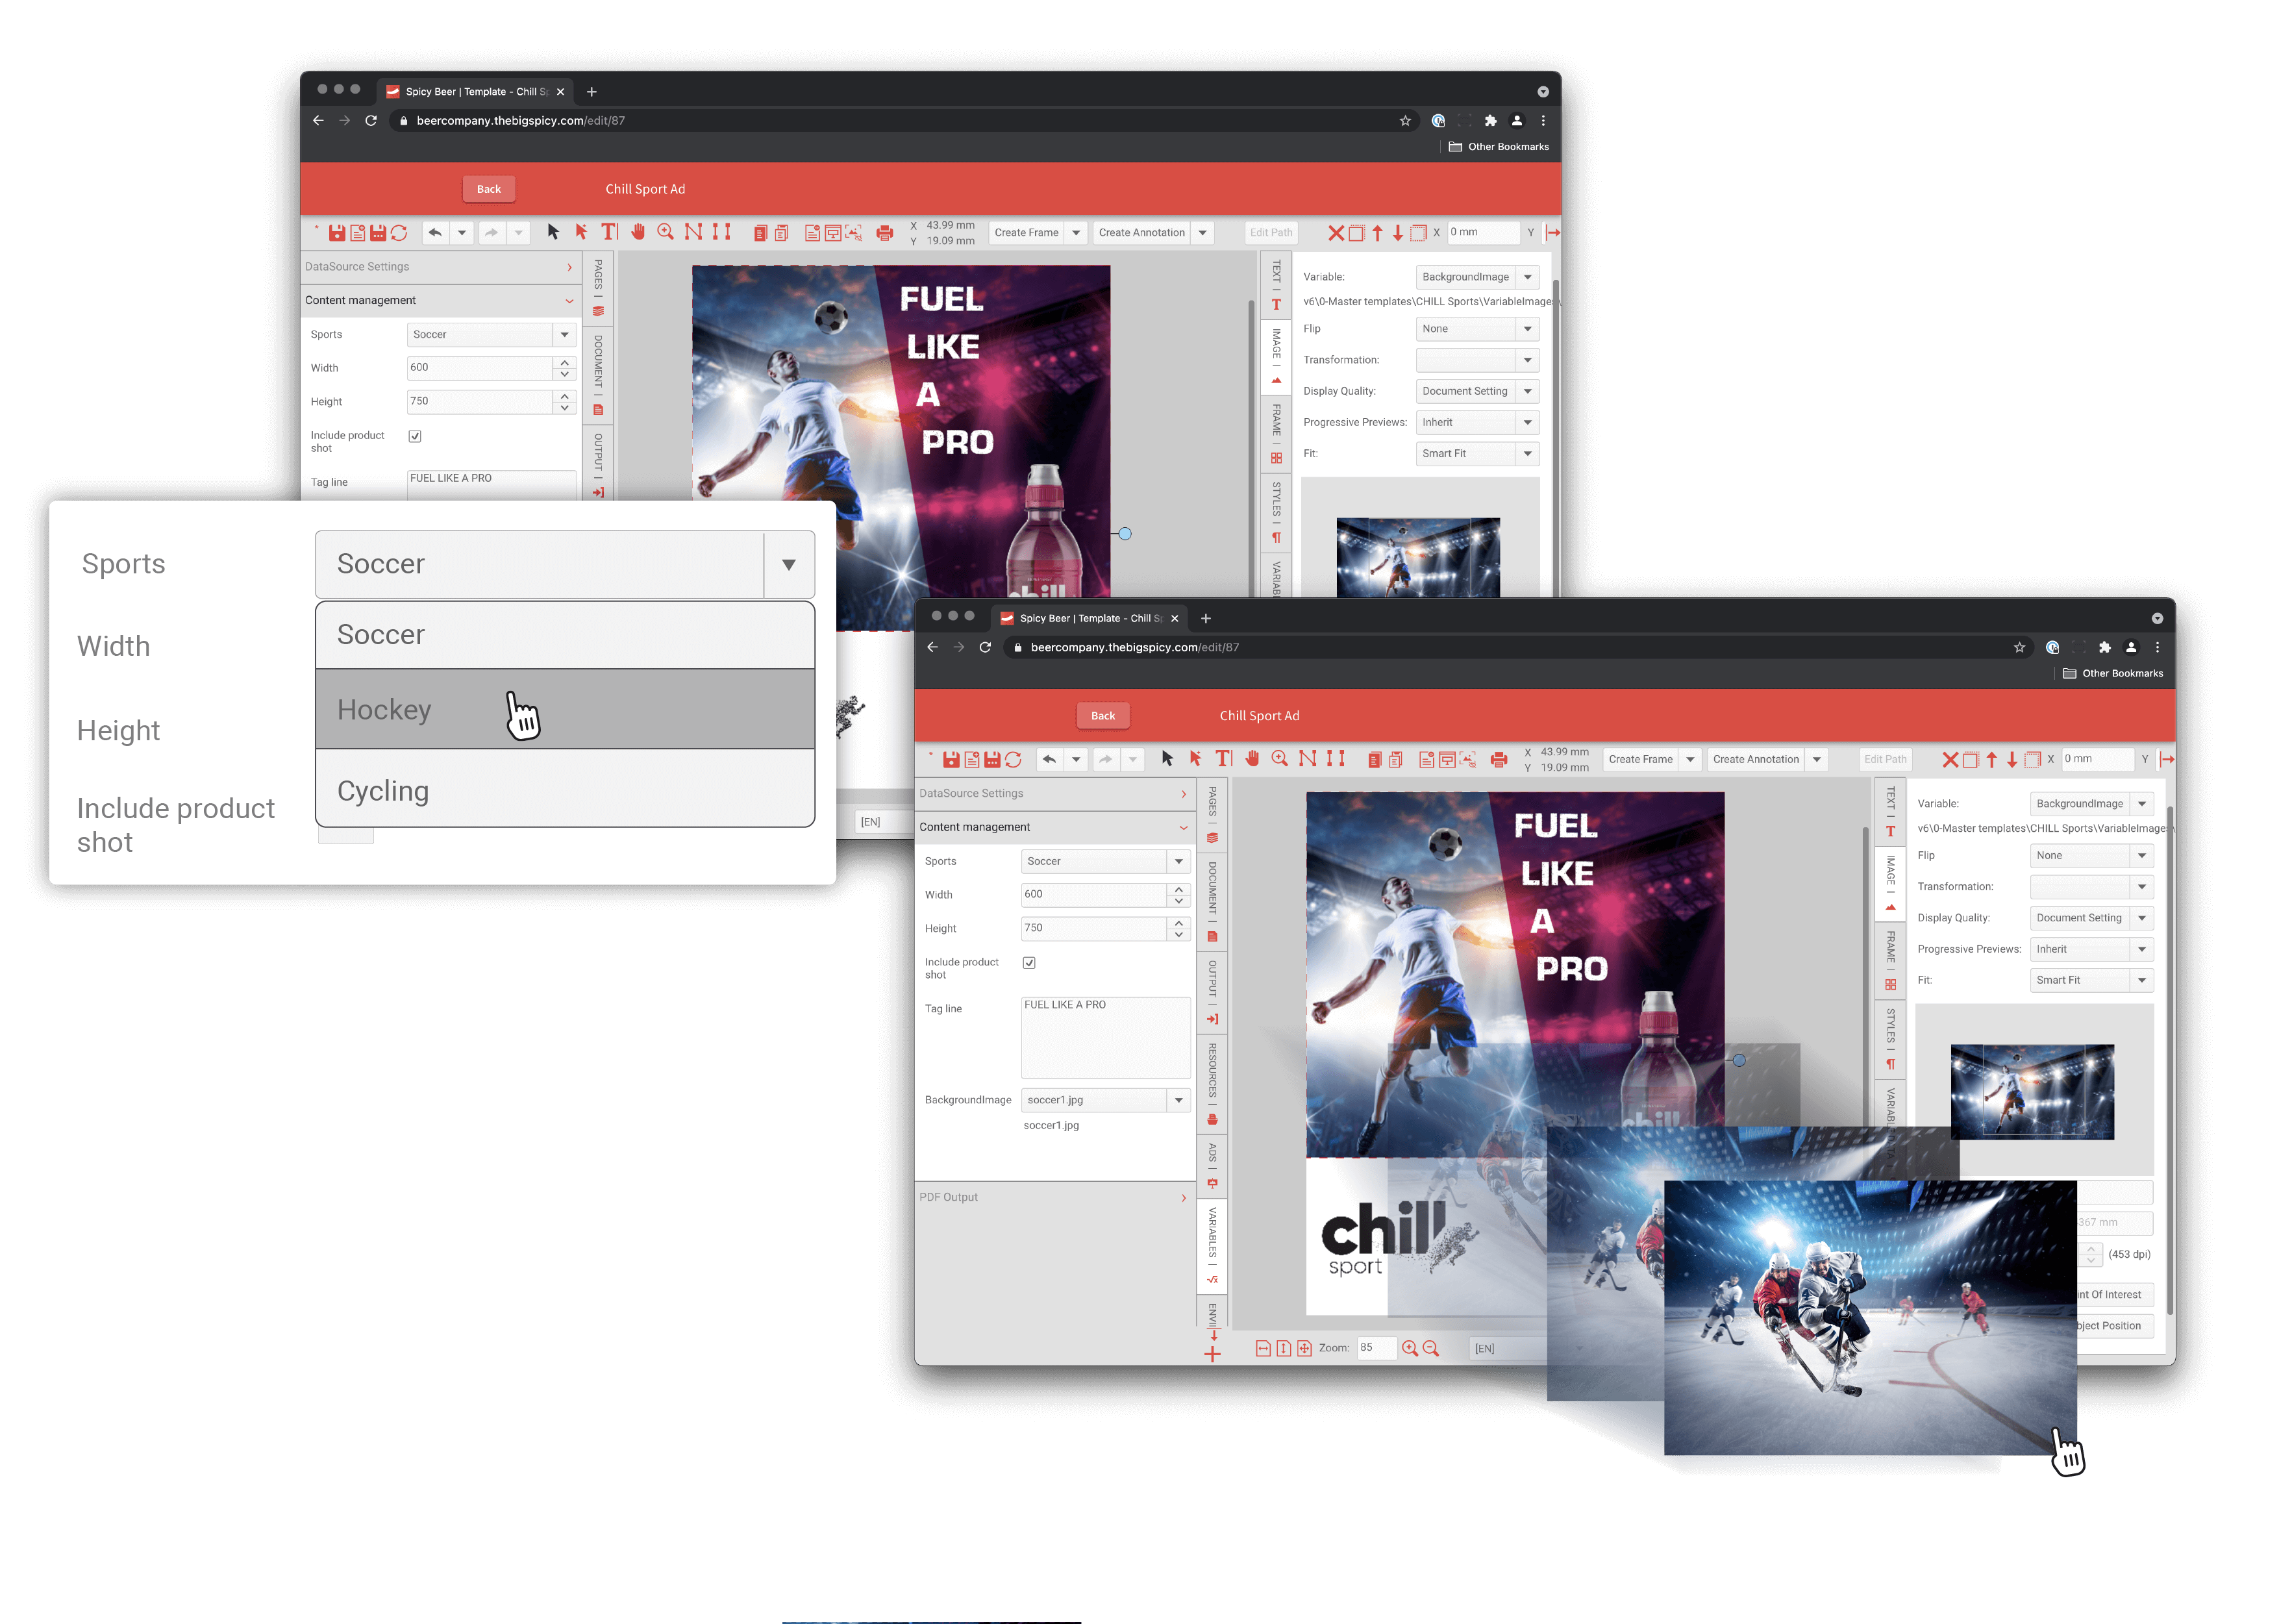
As an example, you could set a variable like a checkbox to change the value or the visibility of another variable, or even make changes to the template itself, just to name a few of the possibilities.
So, imagine if you put a checkbox variable in your badge called “Show avatar”. When you enable it, an image frame could become visible on the page with a predefined avatar image. At the same time, a new variable would appear in the input form where the user could choose another avatar or upload their own.
[Geek alert!] Structured Text Import
Ready for your first geek-bliss frisson? This one is cool, techie, and really easy to understand. Let’s say you have a ton of texts stored in a database. An example export of that text looks something like this:
<p>This is a biographical paragraph with <red>colored text</red> and <b>bold text</b> about a sales rep called Salvador Felipe Jacinto Dalí y Domenech</p>
Obviously, when the text is printed or rendered on screen, you want “colored text” to be in a red color, and “bold text” to be in a bold font. You also want the whole thing to be in its own paragraph (the <p> tag).
And you want someone else, preferably someone infallible, to do the styling work for you.
This is precisely what Structured Text Import delivers. You simply create style definitions in GraFx Publisher that match your tags and when you import your text it will be perfectly formatted and ready for you in your Smart Template.
(For a few extra geek points, it’s good to know that you can configure this in three different locations: in the document, in a CHILI GraFx settings file, or through the API.)
So if you are moving styled text from an external system or document format to GraFx Publisher, structure the text with tags then define styles to match those tags in GraFx Publisher, import your text, and hey presto—styled text!
Maybe that was too simple for a Geek Alert, after all.
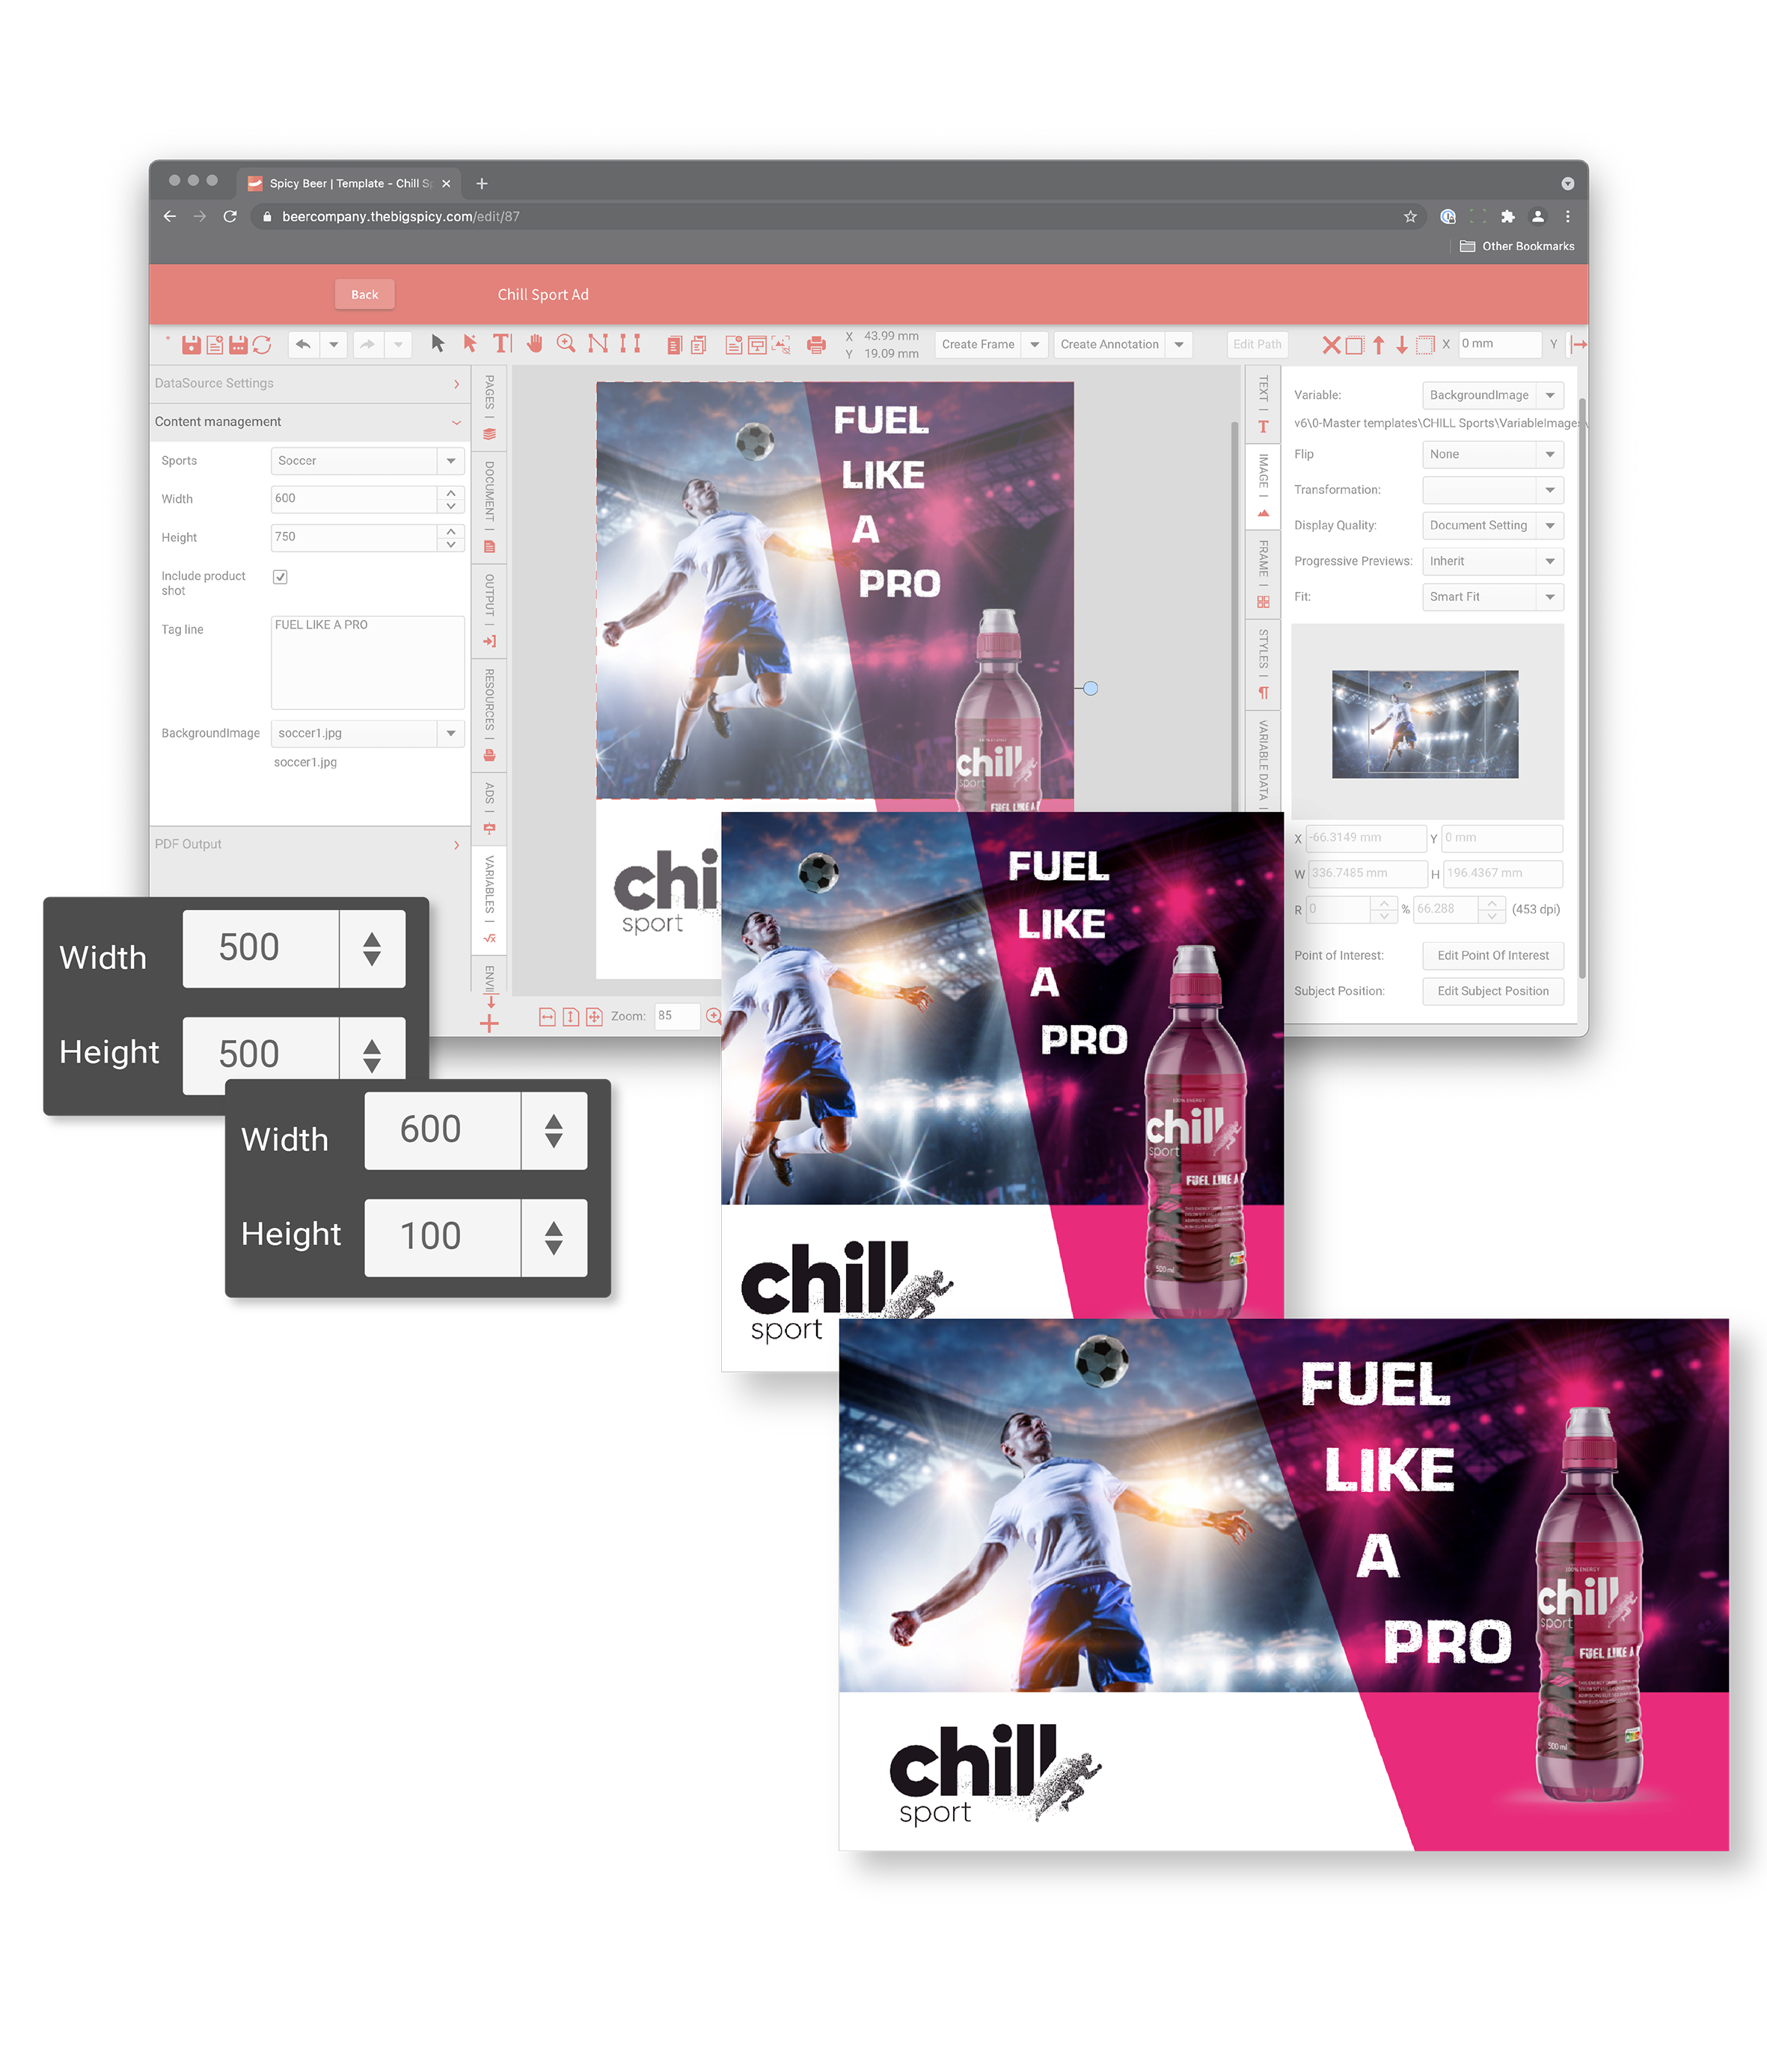
Image fitting
If you’ve ever used a desktop layout application like Adobe® InDesign®, you’ll know the basics of image fitting. Basically, you start by drawing a frame on your page then putting an image in it. If your frame is a rectangle and your image is a square, you “fit” the image to the frame (or sometimes the frame to the image) using common fitting functions.
GraFx Publisher provides a comprehensive set of fitting functions for designers to work with as they create their layouts. They can also be applied to placeholder content for batch import of images.
But as is often the case, GraFx Publisher takes creative automation a giant step beyond what’s available in desktop apps.
Smart Crop
Sometimes GraFx Publisher is going to give you an uncanny sense that it can read your mind. Its Smart Crop capabilities are a case in point.
Let’s say you have created a landscape flyer with a photo of a smiling, happy person riding a bicycle to their local ACME Smart Retail store where the bonanza sale is taking place.
You fit the image so that the cyclist is on the left and you put some text on the right explaining savings, location and what not.

Next you want to create a Dynamic Layout (we’ll introduce these in the next article in this series). GraFx Publisher does a great job of repositioning all the elements in your design, but there’s an issue: the cyclist is now hidden behind some text.
Smart Crop is the very smart tool we created to solve this problem. It works by assisting you in designating a “Point of Interest” in your image then configuring it so that it will always position correctly in alternate layouts and crop out any unnecessary image content.
In the example with a cyclist, for example, the cyclist’s face would always be visible and never get hidden beneath other page elements.
It’s hard to believe it works as well as it does until you’ve seen it in action. But once you have, your design team will give you no peace until you give them access to it. Suddenly, the very tedious and repetitive task of repositioning images in multiple layouts is fully automated!
Ready for more?
And that’s all for article two in this three-part series. We’ve just taken our first deep dive into just how “smart” Smart Templates are. There’s more coming next month, but for now, to truly appreciate these features you should see them in action, so click here to book your free demo today!
Marketing,
Product

Jeroen Cosyn
Sep 29, 2022
Sign up for blog updates
Related articles


